
Limited-stock offer
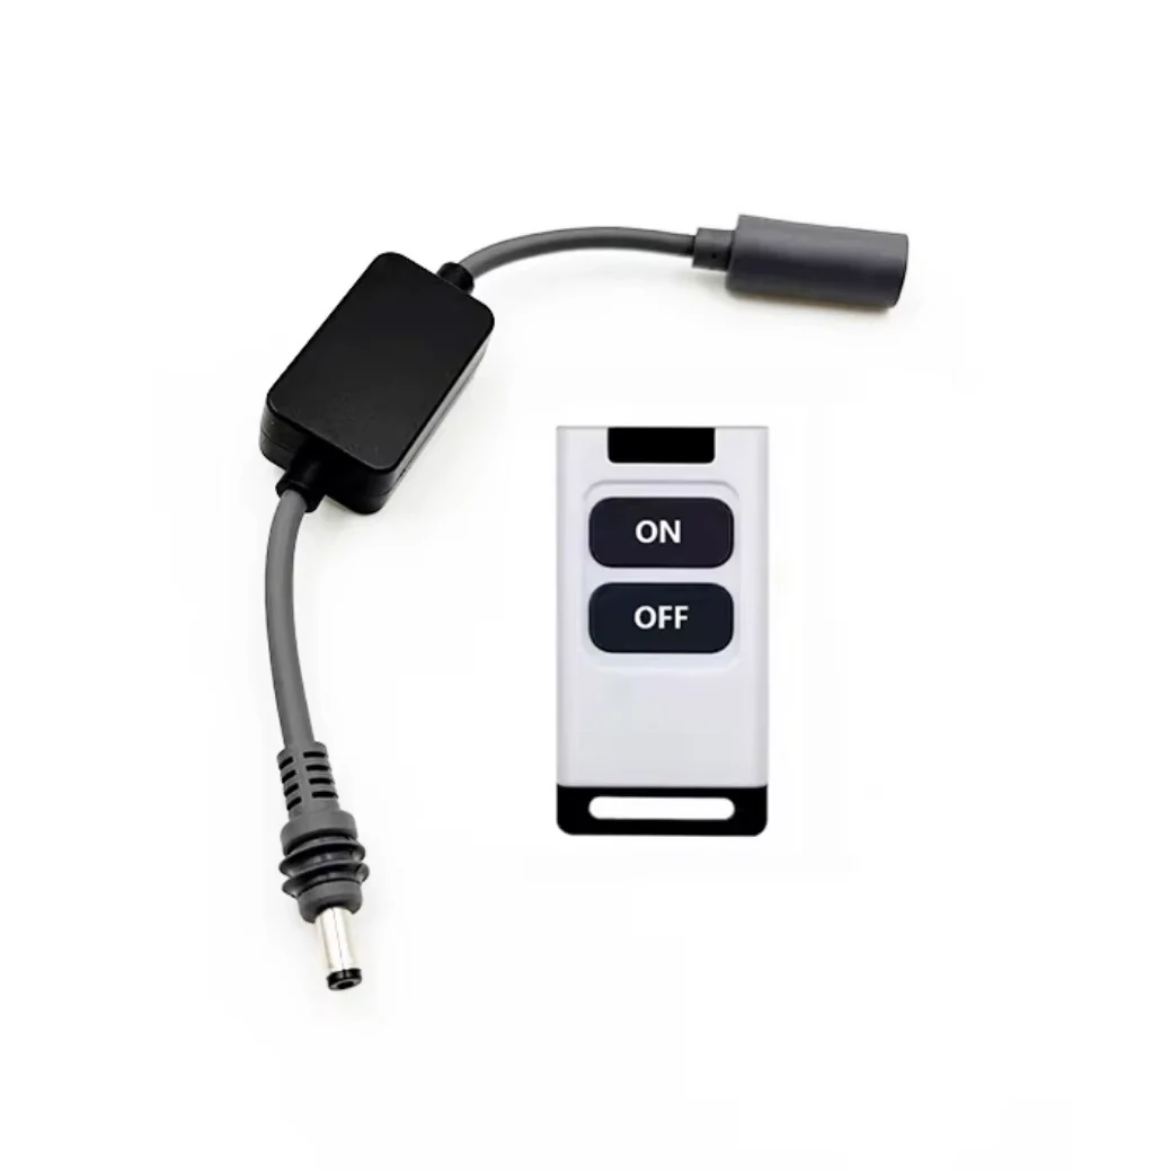
Free Remote On/Off Switch with two remotes, with every mount
Free Remote On/Off Switch with two remotes, with every Fan-Cooled Rooftop Power Hub
One switch, with two remotes, added automatically for every mount. Valued at $89.99.
FIVE-STAR ACCOMMODATION FOR THE STARLINK MINI
Starlink Mini Roof Mountwith Fan-Cooled Rooftop Power Hub
A secure, lockable enclosure designed from the ground up to get the most out of your Starlink Mini on the road. Everything the Mini needs to run properly on a vehicle is built in: the hub steps your 12V supply up to 30V internally, and a built-in cooling system kicks in automatically the moment things get warm, so the terminal keeps its performance when the roof is baking.
It fits all major roof racks straight out of the box, with magnetic and other mounting options available for roofs without a rack, and it comes in a range of finishes. Every unit is designed, assembled and dispatched from the one workshop in Melbourne.
We have allocated limited stock of the Remote On/Off Switch for this offer. One is included free with every Fan-Cooled Rooftop Power Hub, and each switch comes with two remotes, so you can power the dish down from the driver's seat. Valued at $89.99. Once the allocated stock is gone, the offer ends.
$549.99
Free Remote On/Off Switch with two remotes · Valued at $89.99 · Limited stock
- Free shipping Australia wide
- Australia Post partner
- In stock, ready to ship
Colour · Interpon Textura Black
More colours on requestLow Stock Remaining
Every mount is built in small batches, by hand, right here in our Somerville workshop. That means stock can move quickly, and once a batch sells out there's sometimes a short wait for the next run. If you see "Out of stock", contact us and we can hold or reserve one from the next batch for you.
What's included
- Remote On/Off Switch with two remotes, free while promotional stock lasts (valued at $89.99)
- 3mm marine-grade aluminium housing
- Water-shedding 6mm UV-stable acrylic lid
- Secure push-to-close lockable latching mechanism
- Anti-vibration sleeve for the antenna
- 12V to 30V DC-DC converter
- Dual thermostatically controlled IP67 cooling fans
- Simple plug-and-play connection
How you found us
You didn't get here by accident.
You have arrived here after doing the research. You have compared the mounts on the market and decided to do the job properly. That is who we build for. Those who refuse to settle trust Kettle.

From design to dispatch
Designed, Built, Packaged and sent from us.
Every mount is built here, from design to dispatch. No matter how busy the workshop gets, each one is cut, folded, welded, powder coated, assembled and tested with the same attention to detail. We do not batch them up and hope for the best; if something is not right, it gets fixed before it ever reaches a box.
We also do not charge for freight. Every unit goes out via our local Australia Post depot, with daily pickups straight from the warehouse. If you are leaving for a trip and need it quickly, mention your departure date in the order notes or send us an email and we will upgrade you to Express Post at no extra charge.
There is real satisfaction in seeing these mounts progress from a flat sheet of aluminium supplied locally from BlueScope Steel to a finished, powder coated unit ready for a customer. It is a part of the work we remain proud of.
- Material
- 6mm stepped UV-stable acrylic, single piece
The lid
Water-Shedding Geometry
Recessed lids let water pool directly above the terminal. Published research on satellite antennas shows that even a thin film of water on the surface costs signal. The stepped flush profile sheds it while you drive.
A recessed lid sits its glazing down inside a lip, and that lip runs directly above the terminal. Water sits in that recess instead of running off, and dust and grit only make it worse by giving the water something to hold onto. Once a film is sitting over the terminal it is in the signal path, and the only fix is climbing up on the roof with a cloth every time you notice the connection getting sloppy.
We came to this through solar. Jace spent five years as a solar installer before Kettle Customs, and that work shows how quickly a dirty panel loses output. When we looked at a recessed lid over a Starlink Mini, we recognised the same pattern: material accumulating on a surface that needs to stay clear to do its job.
Researchers have measured exactly this on satellite and microwave antennas working in the same frequency range Starlink uses, and what they found is easy to picture. A film of water thinner than a sheet of paper sitting on the surface can knock out more than two thirds of the signal getting through. Even more telling, most of the signal loss in wet weather came from water sitting on the antenna itself, not from the rain falling through the sky. In other words, the dish copes with the storm fine. It is the puddle on top of it that does the damage, and that is the exact thing a stepped lid gets rid of.
Signal-loss figures are from published research on satellite and microwave antennas, not Kettle Customs test results.

The latch
Security that isn't left to chance
We kept coming back to the same problem with a conventional keyed latch. You close the lid, you get distracted, and you walk away without turning the key. Nothing tells you, so the first you know about it is when an expensive terminal is no longer sitting on your roof.
So the latch we fitted is spring loaded and push to close. You press the lid shut and it locks itself, and because you do not need the key to lock it, there is no step left for you to forget. The key only comes out when you actually want the lid open again.

Design
Designed to disappear into the vehicle, not stick out from it.
Function got the mount low and lockable. Aesthetics got the same amount of our attention, because a Starlink on the roof should not announce itself from three car parks away. Every line, fold and fastener was considered so the whole thing reads as part of the vehicle rather than an accessory strapped on top.
The finish does a lot of that work. The housing is pre-treated and powder coated in a fine texture, not painted, because paint chips and fades on the road while textured powder coat shrugs off straps, gear and rack hardware. In black it blends into most racks and roof bars, and in white it sits quietly against a light roof. Either way, people notice the vehicle, not the antenna.
Interpon Textura Black shown.
Available to order, from stock
On enquiry, made to order
- Desert Taupe
- Basalt Grey
- Dusk Bronze
- Expedition Green
- Deep Ocean
- Signal Red
These colours are available by request rather than held in stock. Contact us before ordering and we will confirm the finish and lead time.
Colours shown are indicative only. Screen rendering will not exactly match the powder coated finish.
Finish
Sleek, rugged powder coat finish, built to handle the rough treatment.
Every hub is pre-treated and then powder coated locally in a fine-texture finish, and the texture is very much the point. A mount on a roof rack gets knocked by gear, dragged past by straps and clamped down by rack hardware, and a smooth gloss shows every one of those marks. The texture takes that treatment and keeps looking like itself, so scratches and staining do not read across the surface the way they do on a flat panel.
We hold Interpon Textura Black and Interpon Textura White in stock and both ship at the one price, so choosing between them costs you nothing. If you want something else, we can coat it in a wider range of colours on request, but those are made to order and carry a lead time, so send us an enquiry first and we will tell you honestly where it sits.

Power, cooling and wiring
You bring one 12V feed. We have done the rest.
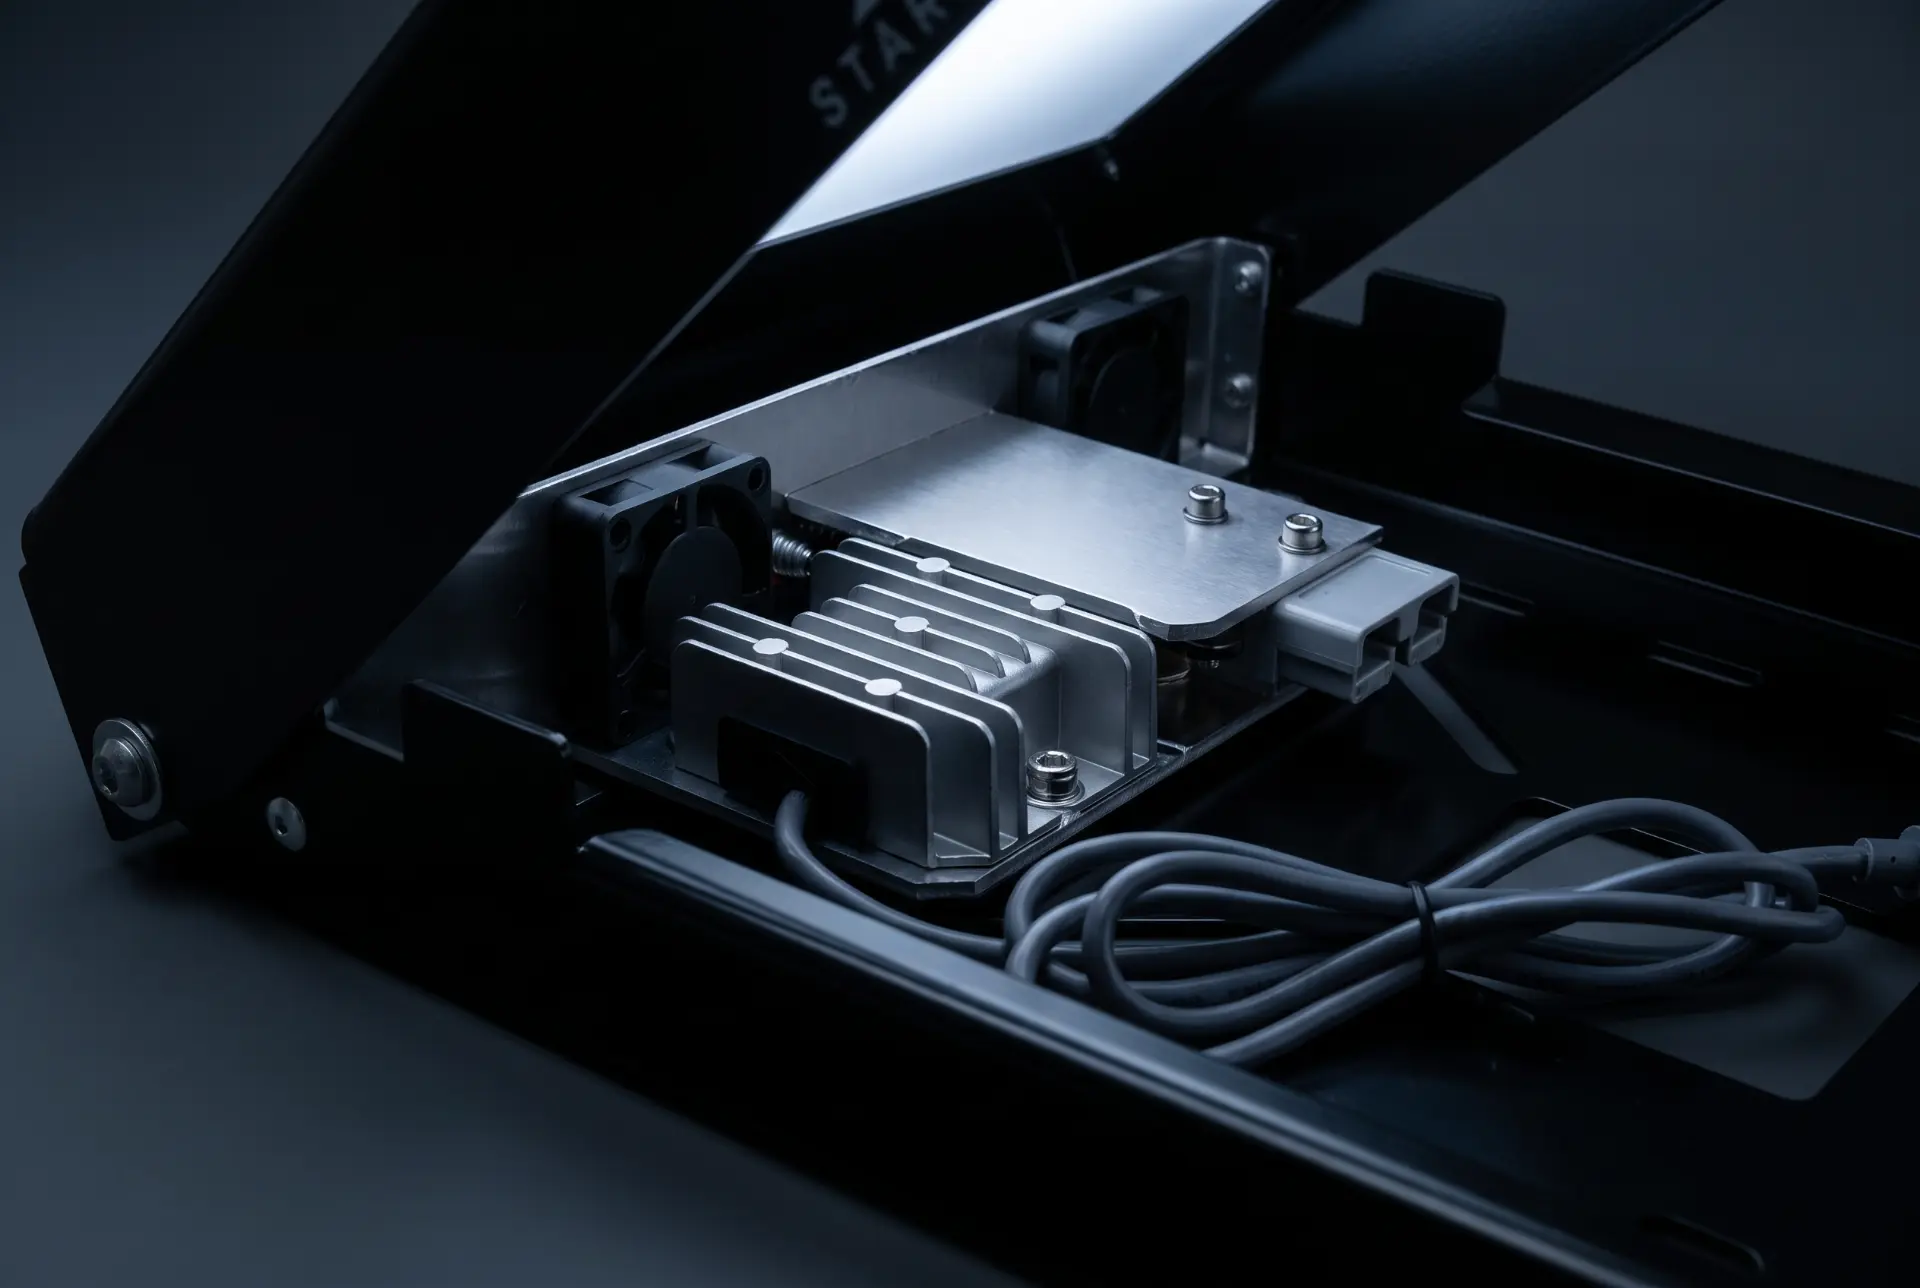
The only thing you have to organise is a fused 12V feed from the vehicle up to the mount, finished in an Anderson plug. From there it is our problem: the converter inside takes whatever the vehicle is doing to that supply and holds a steady 30V for the terminal. Doing that work generates heat, which is exactly why there are two fans sitting next to it, and the lead that plugs into the terminal is already made up and part of the unit.
The fans are two IP67 sealed 40x40mm units under thermostatic control, so they cut in around 45°C and work in bursts rather than running the whole time you are driving. The enclosure itself is deliberately not sealed, and we want to be clear that this is a decision rather than a shortcut: sealing a box that sits in the sun and makes its own heat would trap that heat against the electronics we are trying to look after. The way it is shaped shields the internals from water unless spray is being driven up from underneath.
You supply
A fused 12V feed from your main battery, auxiliary battery or fuse panel, run up to the roof and terminated in an Anderson plug. Size the fuse to the cable it is protecting, and that is the whole job on your side.
The input
One keyed Anderson connector on the mount, which is a deliberately dull connection to make. It cannot go in backwards, and it is mechanically retained so a week of corrugations will not shake it loose.
Inside
The step-up converter accepts 10 to 28V and hands the terminal a regulated 30V at up to 3A. A cranking dip or a long cable run happens on our side of that converter, so the dish never sees it.
Out to the terminal
The output lead is part of the unit and terminates in Starlink's own sealed barrel plug, so it goes straight into the Mini. There is nothing for you to make up on the roof.
Under the hood
Supply vs output
STARLINK: ONLINE
Illustrative — shows the principle, not measured results. Converter specification: 10–28V input, 30V 3A output.
Your vehicle's supply moves around all day as things switch on and off, and the terminal would much rather have a steady 30V. The converter is what sits between the two of them.
What a 12V line actually does
- Cold cranking
- Starting the engine pulls hundreds of amps out of the battery, and on a 12V system the supply can fall as low as 6V while it is cranking. Every piece of electronics downstream of that either rides the dip out or resets, and you find out which one it is at the worst possible moment.
- Load dump
- Disconnect a discharged battery while the alternator is still charging and the line can spike past 35V. It is the most severe transient in the vehicle electrical environment, and it does not brown equipment out so much as kill it outright.
- Alternator ripple
- Alternators and switching converters lay a small AC ripple over the top of the DC supply. It never goes away while the engine is running, and sensitive electronics feel it even though it barely shows on a multimeter.
- Switching transients
- Every inductive load on the vehicle throws a transient onto the supply line the moment it switches off, and there are more of them than you would think once you start counting coils, solenoids, relays and pumps.
- Voltage drop
- Every metre of cable and every crimp in the run has some resistance, and current flowing through resistance is voltage you never get back. All of it is lost well before the dish gets a look at what is left.
6–35V
What a 12V line can actually deliver, cold crank to load dump — ISO 16750-2
The Starlink Mini accepts 12 to 48V and draws 25 to 40W in normal use, peaking near 60W while it acquires satellites or clears snow. The thing to notice is that twelve volts sits right at the very bottom of that window. Feed the terminal a nominal 12V supply and every crank, every heavy load and every metre of cable run pushes it closer to the floor, and a terminal that browns out halfway through a trip goes offline under a perfectly clear sky.
That is why we deliberately over-size our pre-made looms. We specify cable thicker than the load strictly needs, so the resistance of the run stays low and the voltage arriving at the hub is as close as we can get it to the voltage that left the battery. The converter then holds the output steady on top of that. Two defences against the same problem, because skimping on either one is what puts a dish offline.
Why 30V
Thirty volts is a choice we made on purpose. It sits in the middle of the window, far enough above the 12V floor that a cranking dip or a long cable run cannot drag the terminal under it, and far enough below the 48V ceiling that there is room to absorb a transient. There is a second benefit that we like just as much: power is voltage times current, so the same 60W peak that pulls five amps at 12V only pulls two at 30V, and because resistive loss climbs with the square of the current, the output leg runs cooler and gives away less along the way.
Fitting it to your vehicle
Universal Mounting Options
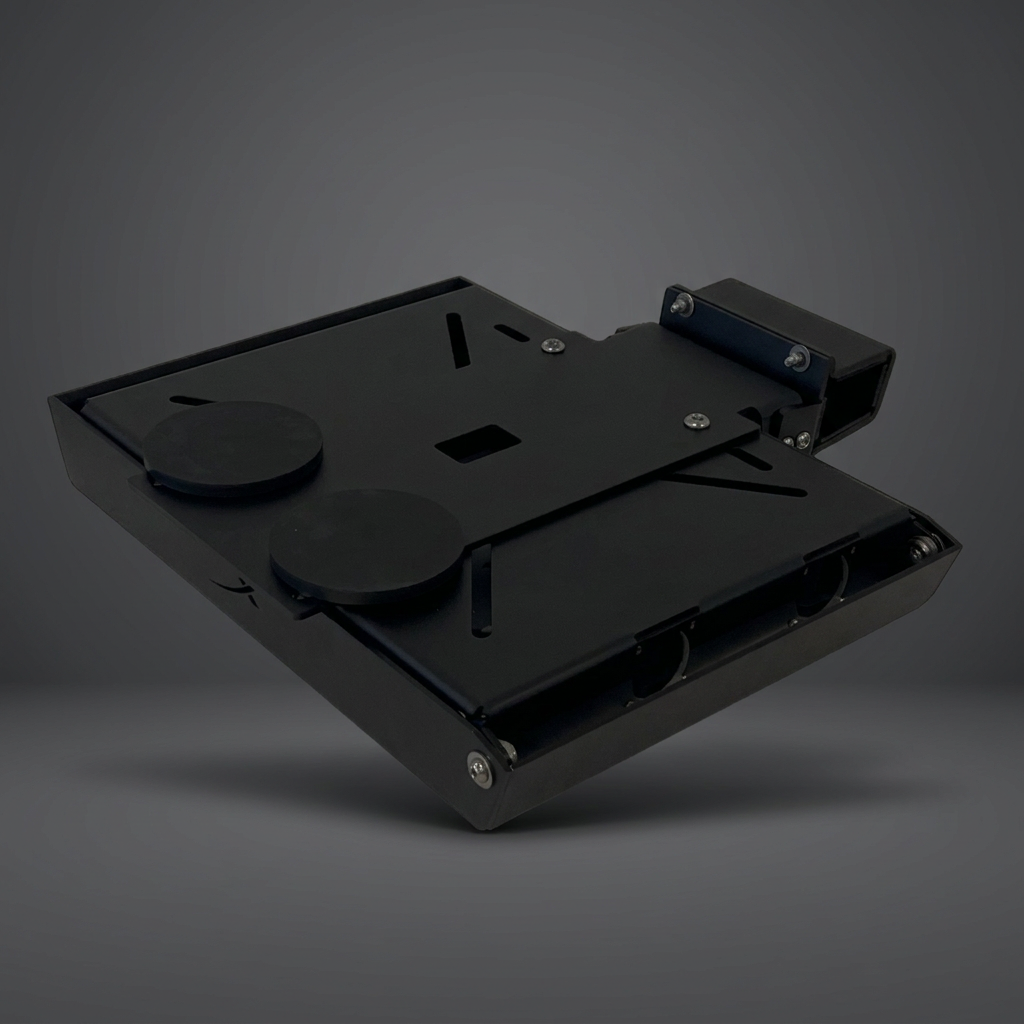
The base is slotted rather than drilled to a fixed bolt pattern, which is why it suits the great majority of rack systems without any adapter kit. For steel roofs without a rack, we can supply strong rubber-coated magnets. For rack-based installs, we point you to the rack maker's own approved hardware — the ARB and Rhino-Rack cards below link straight to the OEM kits we recommend. And when nothing off-the-shelf fits, we can make a one-off bracket in the workshop.
Standard rack hardware
Most installs are straightforward. The slotted base takes standard roof rack hardware, and for rack-based installs we point you to the rack maker's own approved hardware. The ARB and Rhino-Rack cards below link straight to the OEM kits we recommend. When nothing off-the-shelf fits, we make a one-off bracket in the workshop.
Magnetic rooftop mounting
For steel roofs without a rack, we can supply strong rubber-coated magnets. They are the cleanest no-drill option when the roof itself is magnetic steel.
One-off custom brackets
When a standard rack or magnetic fitting is not going to work, we make a one-off bracket in the workshop to suit the vehicle. Please ask rather than assuming it cannot be done.
Not sure? Ask us
If nothing here obviously describes your setup, get in touch with your vehicle and roof details and we will work it out with you before you order anything.
OEM roof rails — Next-Gen Ranger
Next Gen Ranger OEM Roof Rail Clamp
Our own clamp, drawn to follow the exact profile of the Ranger's factory roof rails so it sits down onto the rail instead of perching on top of it. Laser cut and folded 4mm aluminium, pretreated then powder coated in Textura, stainless hardware throughout, with rubber dampening so nothing but rubber touches the vehicle.
Includes 2 XL magnetic mounting feet in the box for extra roof support and paint protection.
From $199.99 · 2X Magnets Included
See the rail clamp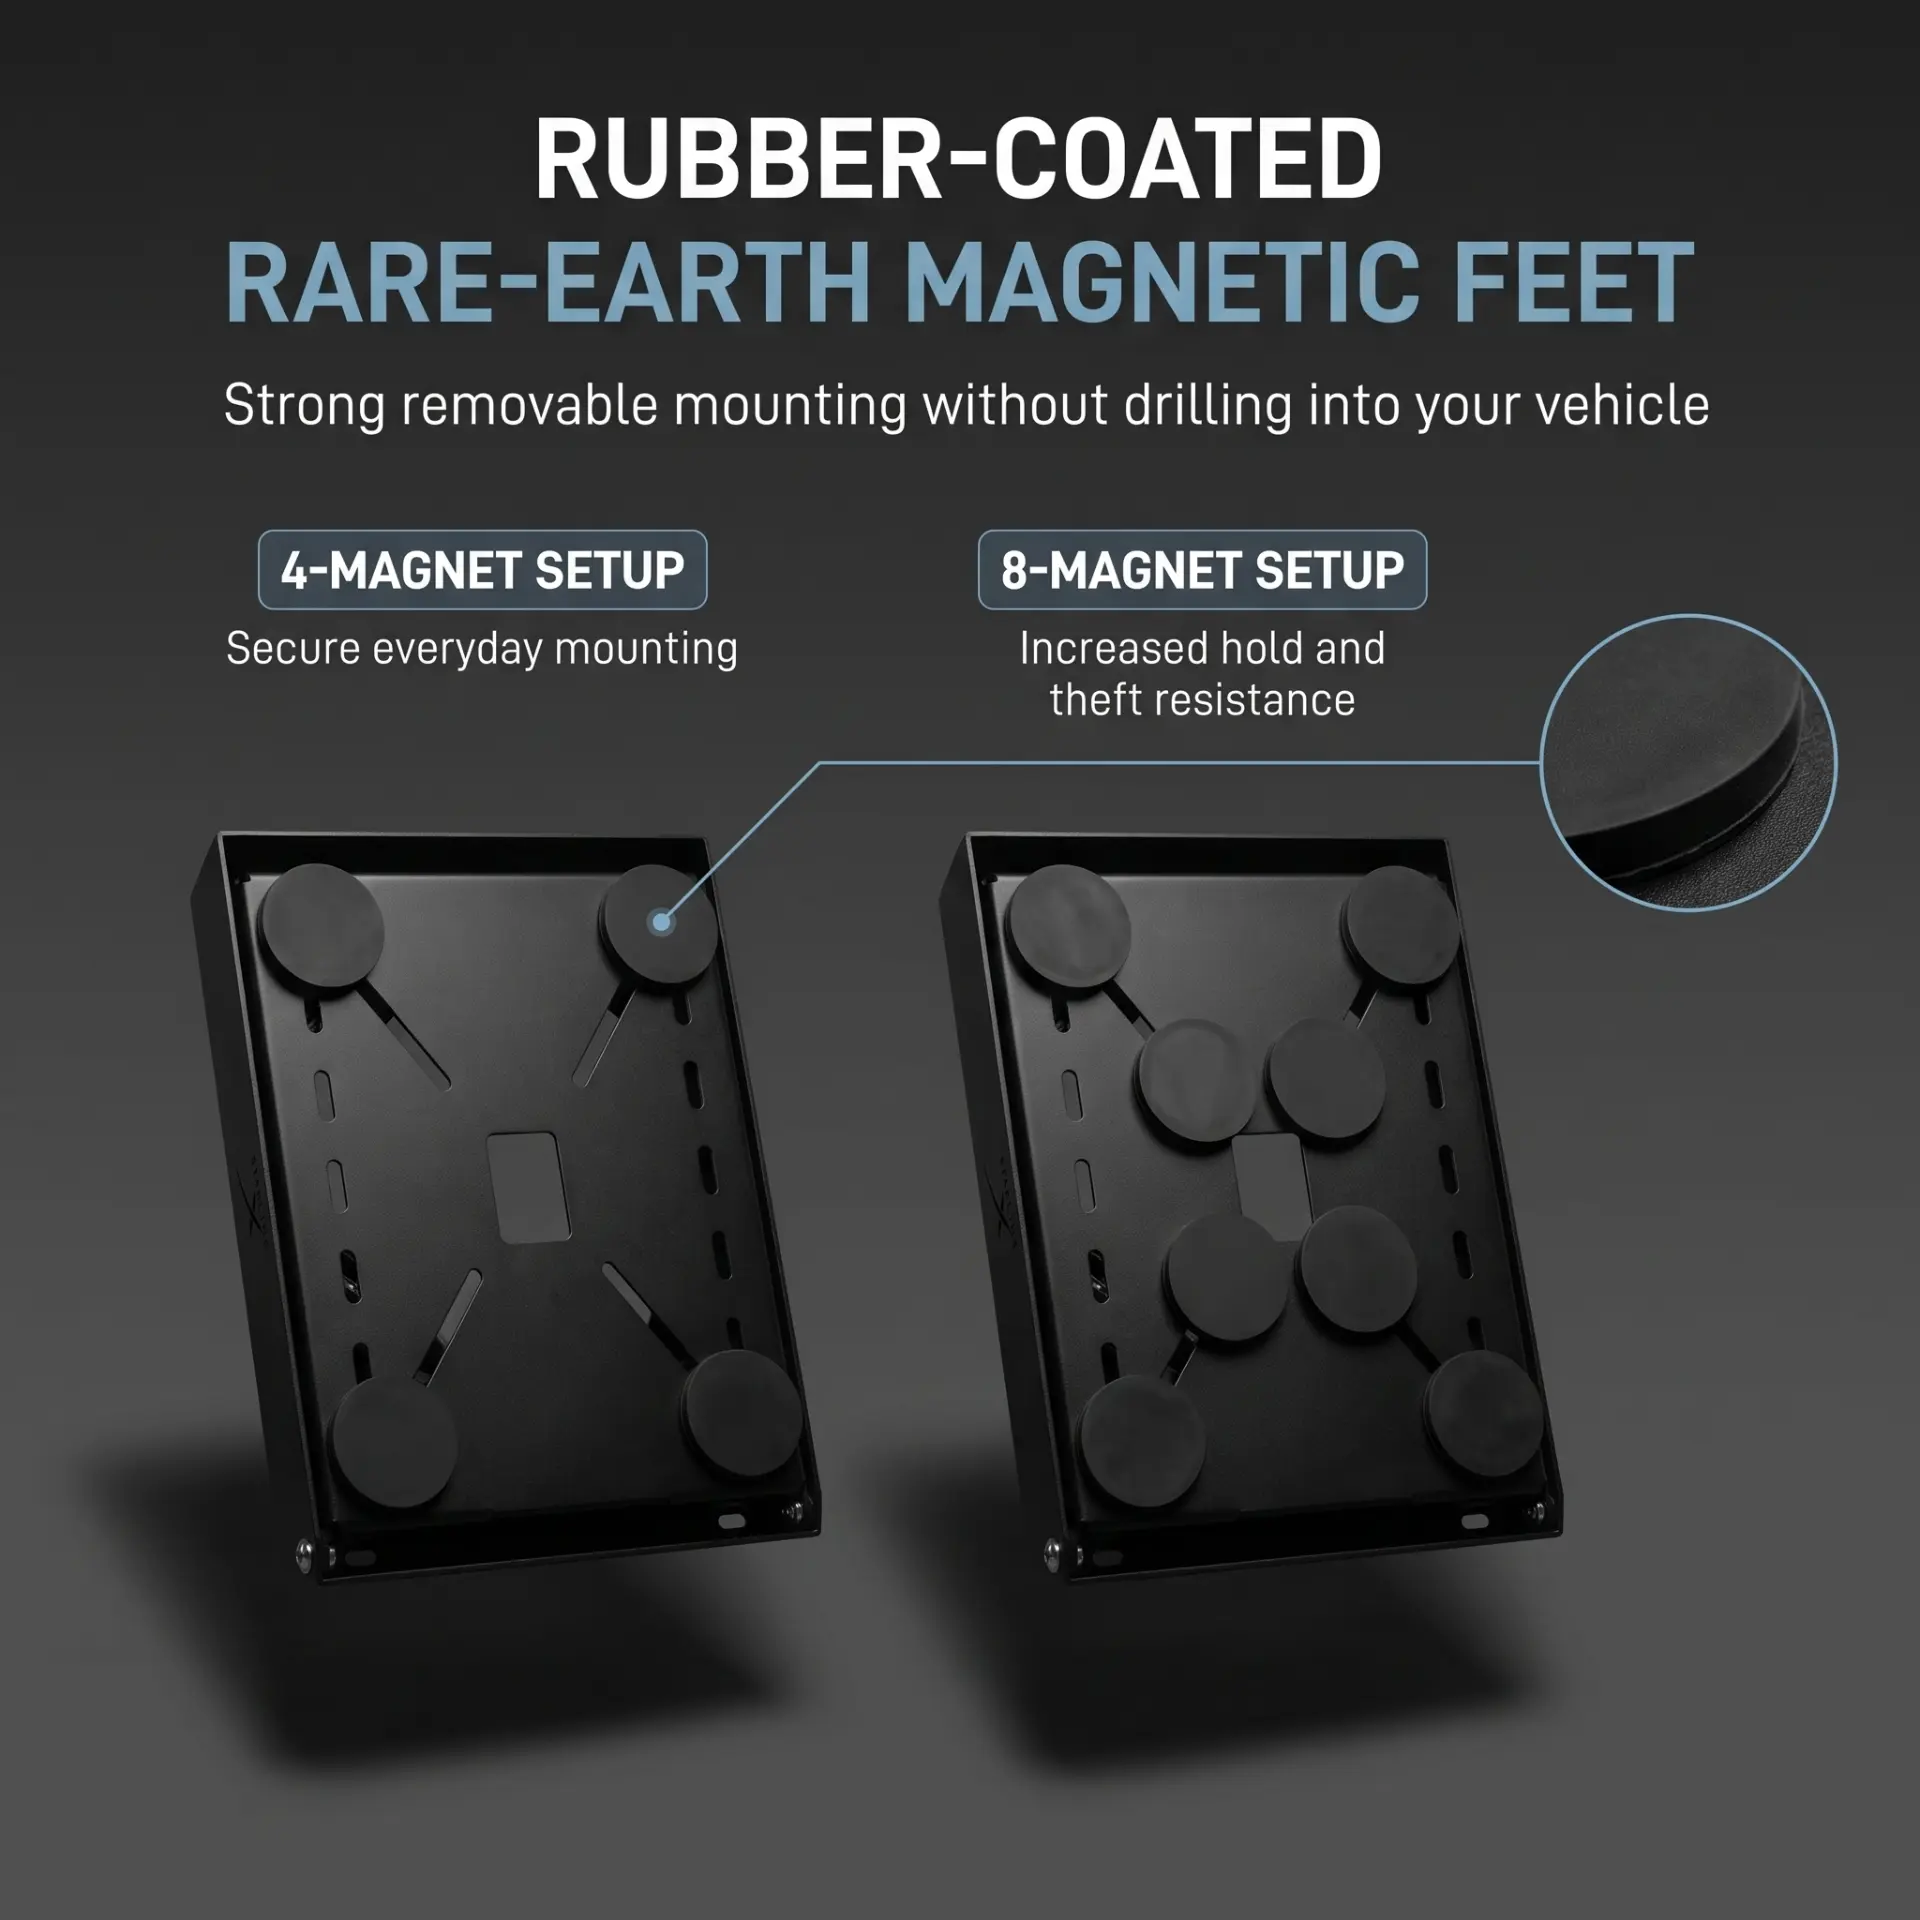
Mounting hardware
Magnetic Mounting Feet, Rubber-Coated Rare Earth (88mm)
The feet we fit for direct-to-roof installs on steel panels. Neodymium N38 in a steel pot, wrapped in rubber so nothing but rubber touches your paint, 42kg pull strength each as a guide. Four for a secure everyday setup, up to eight when you want it effectively impossible to lift off the roof by hand.
$25.00 per magnet · 4 for $100.00
See the magnetic feet
ARB BASE Rack
ARB BASE Rack Alloy Block Set, Nut and Bolt Kit
ARB's BASE Rack is a quality piece of engineering. When you are mounting to a quality rack, the right answer is the rack maker's own hardware, purpose-made for the BASE Rack's dovetail system.
Using the hardware ARB intended protects you. Fitting non-approved custom hardware may put your rack's warranty at risk if something ever comes loose.
Product code 1780610 · 3-year ARB warranty · $98.00 AUD
ARB BASE Rack Alloy Block Set, Nut and Bolt Kit
Rhino-Rack Pioneer / Reconn-Deck
Zwifloc Channel Nuts - 8 Pack
Rhino-Rack's Pioneer and Reconn-Deck systems are quality engineering. The Zwifloc nut drops straight into the channel where it can be fixed, so there is no sliding it along the rail or shifting other accessories to get it into position.
Using the hardware Rhino-Rack intended protects you. Fitting non-approved custom hardware may put your rack's warranty at risk if something ever comes loose.
Part number 61046 · M6 thread · high tensile channel nut
Zwifloc Channel Nuts - 8 PackWe always recommend sticking with OEM hardware made by the same manufacturer as your roof rack. It is the best way to keep your rack warranty intact, and we do not recommend substituting custom-made fixings when the branded hardware is available. If a custom bracket is needed, we make it in our workshop and still use the correct OEM fasteners for your rack. We also strongly recommend against using adhesives on a non-magnetic roof: the adhesive is ultimately relying on the vehicle's paint to hold, and that bond will not hold up under the wind load of a heavy roof-mounted unit at freeway speed. It can get very messy if it ever needs to come off.
If none of that quite describes your vehicle, email admin@kettlecustoms.com with your vehicle and roof setup and we will work out the right approach with you before you order anything.
Low profile by design
Designed to sit as low on the rack as it possibly can.
Getting this mount low was one of the things we cared about most, and the reason came straight from customers. Plenty of people told us the same story: a height limit in the garage, the carport or the underground car park at work, and a roof-mounted unit that was the difference between driving straight in and reversing back out. So we designed this one to be one of the lowest-profile Starlink Mini mounts you can put on a vehicle.
Keeping it low does two other jobs as well. It keeps wind drag down at highway speed, which your fuel bill and your roof rack will both thank you for, and it lets the mount sit tight to the roof line so it looks like part of the vehicle rather than a box strapped on top. It stands 60mm above the rack rails, and the dimensioned drawing further down the page is there so you can check that against your own space before you order.
60mm above the rack rails
Specification
Here are the numbers
Everything below is measured off the production unit or taken from the specification of the parts we fit, so you can plan the install around confirmed details.
On the rack
- Height on the rack
- 60 mm
- Overall dimensions
- 393 mm L × 288 mm W × 60 mm H
- Weight (mount only, Starlink Mini not included)
- Approximately 2.5 kg
Compatibility
- Fits
- Starlink Mini only
- Does not fit
- Starlink Standard or Gen 3 terminals
Power
- Input
- 12–28V
- Output
- 30V 3A regulated
- Input connection
- Keyed Anderson connector
- Output connection
- Sealed plug to the terminal
Cooling
- Fans
- Twin 40x40mm, IP67, thermostatically controlled
- Enclosure
- Deliberately not sealed, so heat is not trapped
Construction
- Materials
- Housing: 3mm marine-grade aluminium. Mounting bracket: 3mm CNC-cut and folded aluminium. Lid: 6mm stepped UV-stable acrylic, single piece.
- Finish
- Interpon Textura Black or Interpon Textura White powder coat
Dimensioned drawing
All figures are in millimetres. We have put the drawing here so you can hold it against the roof space you actually have, between your rack rails and under whatever is already up there, whether that is an awning, a roof top tent or a solar panel. Better to find the clash on a drawing than on the roof.
Designed for
Where these are already working.
- 01
4WD and touring
- 02
Caravans and RVs
- 03
Trade and construction
- 04
Fleet
- 05
Government and utilities
- 06
Emergency services
- 07
Remote worksites
- 08
Military

Complete the setup
Add the Starlink Mini Dish, $299.99
We keep the dish in stock so you can order the complete setup from one place. Add it to the same order and the dish and hub are packed and shipped together, with no second delivery to wait for.
Questions